Showing posts with label repotting. Show all posts

Sunday, 30 March 2014

Big pine repot


I decided to take the risk and repot the large field-grown Scots pine I bought last year as knew that it needed to have the old soil removed for it to really thrive. It has had a good year with plenty of food and water and was strong enough to deal with the trauma of the transplant.


I allowed the soil to dry for a few days as its much easier to remove than if it was wet and muddy. The tree and old soil was very heavy and hard to work on - leaving my hands covered in blisters - but it was the right moment for the work with the new growth just starting to swell. The big risk is that the trauma will loose me some of the top quality back budding that developed last year.


The old soil from field growing contained heavy gravel and some chunks of flint. There were large dry sections with no roots because the rocks and heavy soil made it hard for the water to penetrate the dry areas. I hope it won't be too upset with the bare root treatment - I have waited until the perfect moment to repot it and based on previous experience it will continue to grow as if nothing has happened. The improved breathing and watering around the roots should give a useful boost in vitality as the season progresses.


Once I had cleaned off all the old soil I could see that 2 major roots were growing upwards which couldn't be removed now. Once the rest of the root ball is mature enough they will be dealt with. The surface roots at the base of the trunk will then be quite good.
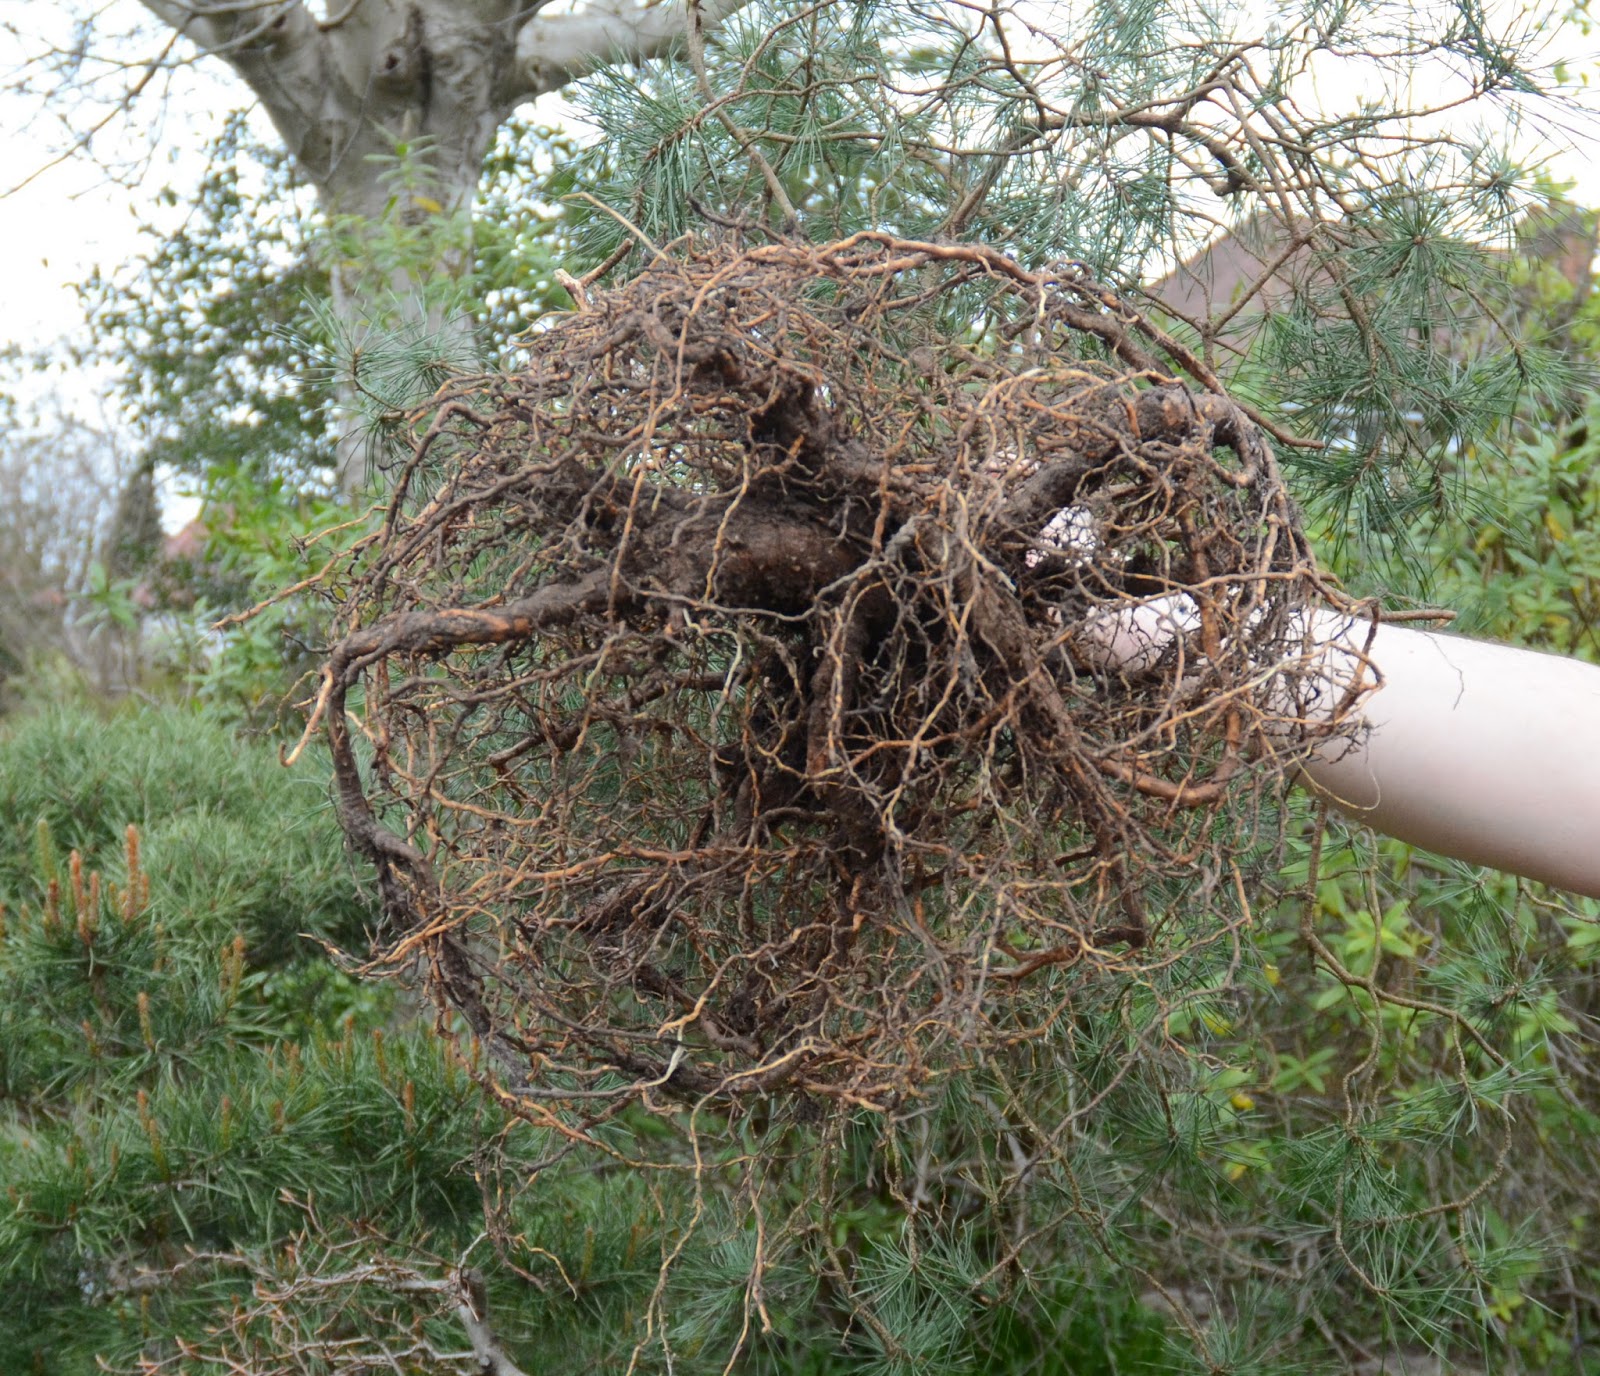

The clean root ball was still quite nice. I had spent a few hours cleaning out the old soil and trying to damage the roots as little as possible. I also didn't want to use water pressure to clean the roots as I wanted them to hang onto as much of their beneficial fungus as possible. I also added a few sections of old roots to the bottom of the new pot to help the fungii even further.


I took a chunk off the bottom of the lowest taproot to seat the rootball deeper into the pot. Once it was positioned I began gently filling and working into the gaps making sure there were no air gaps under the base. I added further soil in by layers and worked it carefully around the roots. Filling the pot in one giant pour and then poking it frantically with chopsticks ends up traumatising the poor roots.

The large training pot is from Kaizen - and the soil is all the usual stuff. The draining layer is large Canna clay pebbles. Then its supalite and pinebark with a bit of fine biosorb.


Some of the roots above the soil level will be trimmed off in 2 years time once the roots below soil level have caught up.


A few big chunks of root removed were removed - none close to the trunk - all from the ends of the roots where they had formed heavy nodes at the edge of the pot.


I lowered the soil level around the base of the trunk in preparation for the next repot in 2 years time. I intend to lower the soil level by about 1 inch at that time to bring the whole pot down to the level that the soil is against the trunk.

The tree was then watered heavily to clear out the dust and settle it all in. As per usual I watered with canna rhizotonic and light organic fertiliser to help the roots recover. I will be watching anxiously over the coming weeks to see that it recovers.


Monday, 24 March 2014

Maple repotting recovery time

This post is a note to myself - and those who are interested - on how long it takes a maple to recover after root pruning and repotting. Many new bonsai growers have wondered how long it takes when they do their first repot - so here is what I've observed this year.

On the 18th of Jan this year I repotted one of my larger maples - it has now settled into its new pot and is doing well. The first flush of growth has hardened off and I've done some light cutting back. There is some second flush growth coming through now as some of the shaded inner buds are opening.


By the 28 Feb the new roots were visible on the surface around the trimmed-back root ball. (5-6 weeks)


By the 22nd of March I have visible surface roots in all corners of the pot. The soil height is rising as well with all the activity going on underneath. The average growth on the new branches is about 40cm. I have trimmed this back around the apex where I don't want this much vigour and left it on the lower branches where I want to thicken up and add ramification. ( 8-9 weeks )


Immediately after repotting the maples were given root growth stimulant and mild fertiliser. After 2 weeks they were on normal strength regular fertiliser. I watered and fertilised based on the colour of the surface of  soil.


Sunday, 19 January 2014

Japanese maple repotting


It's been a winter with mild temperatures and a lot of rain in southern England. Some of my maples have already started budding so I began to do their repotting sooner than I had planned. These maples seem to begin their summer growing based purely on average temperature.

The inspection of the roots is important. Soils and growing conditions are of great interest to bonsai growers - as you can tell by the number of opinions on soil mixes out there. It is also an opportunity to get hands on and fiddle as opposed to sitting back and watching them grow ever so slowly.

My maples are grown in the classical Japanese method of graded layers of Akadama. A coarse drainage layer topped with finer particles for the roots. This is the technique I have seen in many of the old Bonsai Today magazines which had translated articles from old Japanese nurseries. I am deviating now by using a drainage layer that doesn't degrade and introducing more ingredients into the main body of soil that won't degrade.

I suppose a few hundred years had taught them how to grow maples in an optimum fashion with Akadama. They do write a great deal about how the roots effect the branches of the plant above - so I'm hoping that my root ball full of lovely fine evenly radiating roots is going to give brilliant foliage this year.

Overly strong big thick roots can result in some parts of the foliage getting too vigorous and giving excessive inter-node length.

It seems to me that as the number of buds was increasing that the inter-node length was getting shorter.

They advise adjusting the drainage layer to suit the amount of watering and fertilising - my use of liquid fertilisers will alter this old advice as the soil won't clog up with organic debris. I have also read that some no longer bother with the drainage layer. I am still going with a layer of coarse baked clay on the bottom of all my pots.

Its pot was well shaped internally and after the wire was removed it came out very easily. The condition of the roots on the sides of the pot were not brilliant. This maple had been standing outside in the winter with no protection from frost or rain so this may be the norm.


This one was grown over a coarse drainage layer of Biosorb. The two distinctly different substrates made it easy to cut back the base of the roots to just below their old level.


Once the roots were out of the pot they were untangled and combed out - any crossing or thick roots were trimmed back( there were not many of these ). The roots were now in good condition as they are already been straightened out from previous repottings and were radiating out evenly. A few new surface roots were running circles around the trunk and were removed. The tree had been in this soil for 2 years and was ready for a trim. I did clean the bottom of the root ball as well - happily there was not much there other than lots of fine roots.

Most of the old soil is removed. This was 2 line Akadama after 2 years outdoors - I saw very little degradation of it.


This maple is now coming into its 7th year with me. The trunk is 6cm thick and the roots above ground at 12cm. It is starting to look very attractive. It is also developing a rather nice bark.


I am gradually moving away from Akadama so this is about 50% Akadama and 50% Fuji volcanic grit. I am only using Fuji volcanic grit because its what I have on hand that won't degrade - any other hard modern substrate will suffice. All the substrate is mesh graded and dust free. In addition I have added a large helping of rootgrow to help it along. I have found that this gives the maples a good deal of extra energy.

I will continue to grow these with Canna nutrients. This year I will use the Hydro Vega product which is for run to waste hydroponic systems using inert substrates ( basically what I'm doing with bonsai ). I did also apply Rhizotonic to when I gave it its first watering to help the new roots along.

The first leaves are out ( repotting timed perfectly ) and I expect the maples to be in full leaf by in another few weeks.


Wednesday, 20 November 2013

Oak Rescue


Here is my first oak at the beginning of the year - 6 or so years after I found it coming up in my vegetable patch. It was starting to look quite pleasing to my eye. A little skinny still but a few more years will fix that. It's the first oak because there are 3 more that have come after it that are gaining weight in the field and big pots and will be a lot better at this age.

The evening after this picture was taken we had an unpredicted but very heavy frost. I now realise that the skinny pot had also made the roots very vulnerable to the frost. The foliage was quite badly damaged - but not as much as a maple which had all its leaves killed.

I took the tree back under glass until the frosts were gone. It then went into a sheltered location outside. It had lost its vigour - no new growth happened - but there were still many good leaves. At this stage I was already applying foliar fertilisers and Rhizotonic.


My cat is peculiar little beast. She came running into my study yelling loudly for me to come and look. She then ran straight out and showed my the poor tree lying on the paving. Quite how it was wrenched out of its pot and thrown several feet I don't know.

I could see that there were very few live roots left - burned away by the frost I think. I got a little hope from a few new white roots visible on the edge of the root ball.


Somehow I just couldn't keep the tree upright. it got walked into and collided with for no good reason several times - no matter how far out of the way it was. This was making me very angry and I decided that action was needed if  it was going to be saved - and that I wanted to save it. I ordered a new pot for it. 

The tree needed to be in an environment that was going to encourage it to grow roots and recover. 


The drainage layer is hydroponic clay pebbles - with the usual mesh over the holes. Then I placed a layer of coconut fibre. As an experiment I also bought some mycorrhiza specific to oaks which I sprinkled on the layer where the roots were going to sit. This would put it in direct contact with the roots.


I have been using a lot of coconut fibre (coir) for vegetables and some other growing projects - my chilli plants this year have been the most productive ever in this growing medium and the results are very good for other species. Other growers also report that it is similar to sphagnum moss in its ability to stimulate roots.

In my limited experience so far the organic growing media tends to attract fungus gnats in great numbers. I am in the process of trying out several cures. 


The constant mist technique is used commercially for rooting cuttings. I tried to follow this methodology and mist the foliage as often as possible - aiming to keep it constantly moist. I also used some foliar feed and applied Canna Rhizotonic to the foliar feed.

I would advise you not to use fish emulsion as foliar fertiliser as during the summer it will attracted a great number of flies.

I also used Canna nutrients specific to the type of coco soil I was using and some additional Canna Rhizotonic to additionally stimulate the roots and relieve stress.


It took a long time but I have got new growth again. I hope this has put enough energy in so that it survives the winter.

I shall be more careful next year.

Saturday, 21 April 2012

Oak progress


This is my first Oak - discovered coming up amongst the tomato plants in the vegetable patch about 6 years ago - the work of a forgetful squirrel.

The next 4 Oaks are growing in containers out back - also from acorns. Nice little trunks on them already. I think i shall try for larger containers for them this year.


I think the warm March got it going a little early and a few late frosts really hurt it. I became concerned and brought it in under glass to help it out a little as we have had a few -4 ( friday 4 april  according to a local weather station ) nights lately. Under the more comfortable circumstance it has begun growing energetically.

I have done some light wiring - but they new shoots are very delicate and the leaves are brittle and will crack and break easily. I find the Oak is a bit easier to wire when its hardened off a little.

I have some black slime growing on the soil surface ( i call it pot snot ) so i will remove some of the top layer. There is also a lot of moss and it makes it hard to water.


This oak is rather pot bound now. The roots and soil are quite rot free so they will have to soldier on for another year. The soil mix is finely graded Akadama and fuji grit - and the Oak has loved it. The Oak is subjectively easier to grow than pines and is more tolerant of watering and fertilizer.


Here is the little Oak today. Once mother nature gives the signal it is one of the fastest growing trees i have ever seen.

There are probably 10 times as many growth points this year. I am hoping that this first flush of leaves will be smaller than last years.

A lot of wire is going to be used to tame this one.

Thursday, 3 February 2011

more potting

This is my gin&tonic calamondon tree. It had been in this pot for 2 years and was ready for a larger pot and some fresh soil.


This is its second repotting in my care. This was akadama bought off amazon with a little compost - and its worked very well. The roots are beautiful.
Excellent roots. No rot at all. Great health. I was so very pleased when i pulled this out of the pot and saw how healthy the roots were.

Its growth had been exceptionally strong this last year.

These plants are very hungry and need a huge amount of fertiliser in the sterile soil. Full strength at least once a week.


The roots are well organised and worked out perfectly radially with a rake. They were well organised from the previous repotting so it was quick and easy. A few more years and those surface roots are going to look very good. I cleaned off the old soil and trimmed lightly.


Its been planted into quite a large pot. I'm using biosorb and pine bark. about 4:1 mix ratio. There is a 1.5cm drainage of layer of coarse soil.

After 2 weeks the tree is looking greener then before it was potted. It seems quite happy with the new pot.

The plant is now in a totally inert pH neutral soil. I have a new fertiliser regimen planned and i hope for very strong growth this year. That trunk is still way too skinny.

PS - a few days later

In most respects this calamondon behaves like a kumquat. So it appreciates a deeper pot as the roots like to go deep - similar to pomegranate with the deep pots and heavy feeding requirements. They seem to be less PH sensitive than pomegranate though. I have potted it over a very generous drainage layer of course soil particles. 3 weeks after repotting and it is back budding vigorously.

Saturday, 27 February 2010

Repotting a small Oak

The buds on the Oak were starting to swell. So it was time for repotting. I'd placed the tiny oak ( which was growing in a peat seedling cup ) in a small pot with an inner lip. It proved very hard to extract. It had been in this pot for 2 years.

I'm going to discard that pot as its so hard to get anything out of it.


Once I'd got it out of there is discovered that the roots were 6 foot long and had been doing laps of the pot. This type of root is very different from other species i had worked with before - and it was extremely pot bound. Interesting that the root growth had been as vigorous as the above ground growth which had been rather extreme during the peak of the growing season last year.


Any of the new acorns ( 12 being prepared now ) that germinate this year will immediately go into larger pots based on this knowledge.


I lack experience with repotting roots like this - so I decided to be cautious and not cut back the large long roots too much. The placement in the pot was defined by getting the large root system into the pot and unwinding them. this may be a mistake - we will see what it looks like when i repot it again in a few years.

The pot is a little to large - but I'm aiming at massive growth over the next 2 years so i need plenty of headroom.

The soil is filtered Akadama and fuji grit ( 70 / 30 aprox ). I'm hoping the fuji grit stops it setting like concrete. The good akadama is cheaper than local hydroponic alternatives and is very effective. So why not ?


The cat was very interested in the process and lent a hand as usual.